Rock Solid and Gorgeous

We did get some good news recently. The granite place has found our ‘Bora Bora’ granite. It’s time for another field trip to London to scope things out.

At this point, we have largely made our colour selections. At least, we think so. As far as the kitchen goes, a lot will depend upon the colouring of the granite. Because there is a lot of colour variation, there could yet be a change in cabinet and wall colours (particularly depending upon whether the granite has an overall ‘cool’ or ‘warm’ cast to it). Much will depend upon what we see when we get a look at the actual slabs going into our house.

The original plan was to have a look at the slabs a week ago. Sadly, that plan changed when Southern Ontario got hit with an impressive and massive snow storm. Mark was supposed to fly in the night before; his flight got cancelled, and driving anywhere that day was strongly inadvisable. As excited as we were to see the granite, the appointment needed to be rescheduled.

As a result of scheduling commitments with both Gene and ourselves, the first time that we could all get out to London was the following Friday. Fortunately, the day was bright and sunny, if still cold and suffering a hangover of the previous week’s storm.

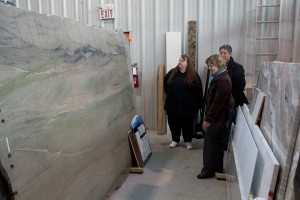
Getting to see our slabs of granite was an awesome experience. We knew that we loved the granite overall, but there were a lot of questions of how all of the colours of the kitchen would come together. We wanted unique and exciting, and we really didn’t want drab; given that many of our preliminary colour choices were technically ‘grey’ (although a green-grey), this was definitely a risk. Given that the colours we had chosen spilled into the yellow end of the spectrum, slabs that had cooler colour tones would not have worked. We would have then been back to the drawing board.

Bora Bora, in all its glory.

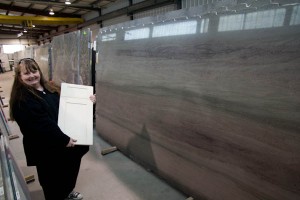
The actual slabs we have secured, however, are definitely towards the warm end of things. And they are absolutely, positively gorgeous. Rather than granite, they resemble a sedimentary rock that has been built up in layers. There are tones of green, grey, brown, orange, black and blue, all depending upon where on the slab you are looking. The overall result should be absolutely stunning.

Checking out the granite for the kitchen. It should look amazing.

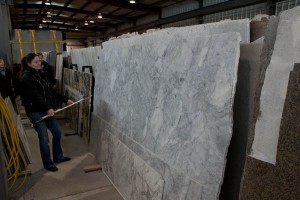
Last time we were out in London, we got so excited picking the kitchen granite that we completely neglected the bathroom. So apart from inspecting the ‘Bora Bora,’ we also had to select a stone for the bathroom counter. The overall design is leaning to a traditional, old-world feel, and something in similar to a marble would be ideal. Marble itself, however, is decidedly NOT ideal. It is a very porous stone, and would quickly become stained from water, toothbrushes and the like. A granite is far preferable, but ideally we want a granite that will have the feel of marble.

The granite for the bathroom. Not marble, but you can see it from here.

We looked at a number of potential slabs, but ultimately went with one that has a lot of ‘texture’ to it. While it is far more ‘grey’ than we had in mind, it should be awesome with the vanity that we’ve selected. The vanity itself will be a deep blue (the actual colour is ‘Indie-go-go.’ Really). It should also play off the tiles that we’ve chosen for the floor and wainscotting beautifully.

Slowly Making Progress

It has been a while since we have posted. Not because no work has been happening, because there has been. But January was a month of personal difficulties, which kept us from many trips to Boo Manor. And there weren’t a lot of major decisions to be made, which has kept the updates down some as well.

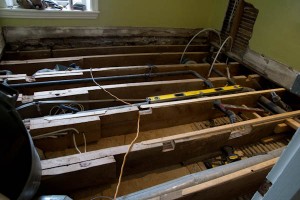
In the meantime, the various work crews have continued to make steady progress on the house. Much of this work will ultimately not be visible, critical though it is. Keelan, for example, spent several days levelling the bathroom floor. This shouldn’t be a big issue, in a room that is about 8′ by 7′, but it surprisingly was. The rough estimate is that the floor varied by as much as 3″ overall, meaning that some parts of the joist had to be shaved down and others needed to be built up. Along the way, some pipes that were perilously close to the top of the joists (and therefore in jeopardy of screw punctures when the floor gets fastened down) needed to be moved. Invisible, all of it, but critical nonetheless.

This is not a level floor. This is not even close to a level floor. But it will be, before we are done.

As well, the drywallers have been through. The kitchen and bathroom have now been closed up, various ceilings and walls have been repaired, and the other holes that have been punched out along the way have been cleaned up and repaired. All in all, the house is coming together and we are starting to get a sense of what the finished product will look like.

The kitchen takes shape. There are walls now. Real, live, drywalled walls.

Next up is painting and flooring. Can’t wait.

We Have a Window!

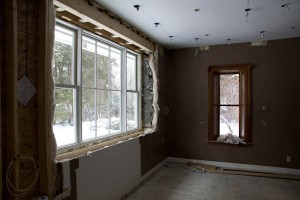
For the past few weeks, we have had a very large hole in the wall of our future kitchen. The masons did their work, creating the space for a large picture window where previously there had only been stone and mortar. And polyurethane insulation. Which, surprisingly, was actually stronger than the mortar, and was doing an excellent job of keeping the wall together even when the masons had other plans.

As fall turned to winter, however, the wisdom of a large and gaping hole became increasingly questionable. Yes, there was a sheet of wood keeping the weather out. And yes, we had duct-taped the gaps (for we are nothing if not enterprising, and duct tape is nothing if not useful). But the outside has been getting colder, and as a result so has the inside.

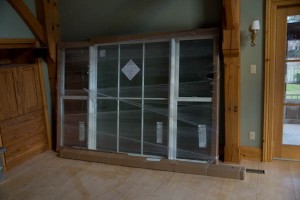
So we were excited to learn on our last visit that the window had been completed. And delivered. And was to be installed the next day.

Our new kitchen window, delivered and waiting to be installed.

During renovations, rooms do funny things. They get bigger. And then they get smaller. The hole in the wall looked a lot smaller than the nine-feet-wide that it was supposed to be. But the window leaning against the wall in the great room looked a whole lot bigger when examined up-close-and-personally.

Still a little rough around the edges. Installation was a challenge.

The actual installation was apparently a little bit of a challenge. Normally, you pop the window into a ready made frame, wedge in a couple of shims to make it level, drive in a few screws to keep it in place and spray-foam around the edges. In this case, however, the window was going into a stone wall that is more than a foot thick. This required some more framing, some delicate balancing and some innovative thinking on Gene’s part to get everything to go together and stay put.

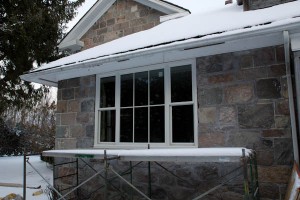
The view from outside. It looks like it has always been there.

But stay put the window did. Everything is bolted firmly in place. We now have a window in our kitchen. A very, very big window. A window that, now that it is installed, looks for all the world like it belongs. And that is a very good thing indeed.

Doing a ‘Mike Holmes’ to Boo Manor

We’ve all seen it. That moment in a Mike Holmes just after he says that he, “really, really doesn’t want to go ripping things apart unless he absolutely has to.” Right before he rips everything apart, generally criticizing the previous contractor along the way.

In the case of Boo Manor, Gene’s son Keelan is our own little Mike Holmes. He and a friend have been busily gutting the various bits of the house that are in the process of being renovated: the kitchen, the guest bathroom and the soon-to-be-wine cellar.

First sign of renovations: the waste disposal bin shows up.

Destruction started with the arrival of a waste disposal bin at the property. After that, it didn’t take long for the drywall to start flying. Those bits that could be reused (the kitchen appliances, cabinets and claw foot bathtub) had already found new homes courtesy of Kijiji (and Keelan’s impressive negotiating skills). Out of the bathroom came the rest of the fixtures, including a hideous 70’s vintage plywood vanity, and a surprising array of different eras of flooring and wallboard. What was left was the bare essence of a room, and an awfully uneven floor. While the overall structure of Boo Manor is surprisingly sound, apparently not all previous renovations have been done to the same exacting standards.

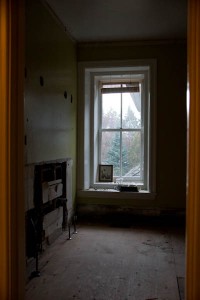
The bathroom, down to the bare walls.

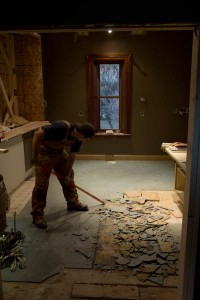
The kitchen floor met largely the same fate. Interestingly, floors seem to have been laid on top of previous floors. A relatively hideous (but apparently fashionable at the time) linoleum peeled back to reveal an equally hideous green tile. It was all coming out.

First there was linoleum. Then there was tile.

Finally, the drywall from the wine cellar needed to be removed anywhere there wasn’t already insulation in place. Building wine cellars is an interesting challenge. In most houses, the goal is a warm house insulated from a cold exterior. This is accomplished by insulation, with vapour barrier between the drywall and insulation to prevent moisture from condensation. For a wine cellar, the process works in reverse: you want a cold room inside of a warm house. Warm walls get lined with vapour barrier, then insulation, and then the wallboard for the interior of the cellar. Or, alternatively, spray-foam the heck out of it the interior and enjoy insulation and vapour barrier combined in one smooshie product.

Out comes the drywall. In goes the insulation.

Removing the drywall, however, also revealed the presence of some previous tenants. Namely, six mice that seemingly engaged in some form of suicide pact and fell into one of the wall cavities. Inevitably, a house this old is going to reveal some surprises. A few of which will unlikely be unexpected pests.

One other unexpected pest that has been discovered is a squirrel that has taken up residence in the eaves above the kitchen. At this point, we have no idea how it is getting in. But there is a hole somewhere, and it is large enough to allow not just squirrel, but also some pretty sizeable walnuts, judging from the detritus that the squirrel has left in its wake. And, given the quantity of walnut remains that the electricians have discovered as they’ve been laying cable for the kitchen lights, this has been going on for a while now. It is a wily squirrel, however; Gene has been trying to set a trap for it, using peanuts as bait. After three attempts, all Gene has to show for it is a small pile of spent peanut shells.

And, beneath it all, there is actually a sub-floor.

All in all, though, Gene and his team have been making awesome progress. The result is that the rooms we are renovating have now been gutted, the mice have been removed and the squirrel is still enjoying a free run of the eaves. From here, the work of rebuilding can commence.

We Were Floored (Tiled, Too…)

Having decided on the granite for the kitchen this morning, this afternoon it was about flooring and tiles. After a lovely lunch at the Katana Kafe (not responsible for the naming, but it is a wholly funky little restaurant right on the edge of London airport; the window looks out on the apron and both runways) we headed to Woodstock.

In our last house, we had tile in the kitchen (and therefore also the dining room, hallway and back entrance, it being all open concept). While easy to clean and durable, it is awfully hard and unforgiving (on wine glasses, as well as on feet). This time around, Dianne was proposing hardwood in the kitchen. While that might sound at first blush unusual (I know I did a double take), apparently it is more and more common to see hardwood throughout the house, including the kitchen. It is warmer, more forgiving and for the most part just as easy to maintain.

In Boo Manor, we already have a great deal of hardwood. In fact, at last count, we have at least five different shades and styles of wood, and that’s just on the main floor. The dining room alone has wood of three different colours – from red to brown – and the great room and new addition has clear maple throughout. So part of the challenge was finding yet another wood floor colour and style that would be appropriate, not clash and tie together maple at one end of the kitchen with century-old oak at the other. How hard can that be?

We found our floor just lying underfoot. Literally.

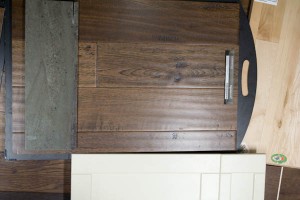
As it turned out, it wasn’t hard at all. In fact, the answer was lying under our feet the minute we walked into the flooring store. And I mean that quite literally. There was a sampling of an engineered hardwood that was absolutely perfect – wide slabs, oak and hand-scraped for a natural, old-wood feel. The boards are beautiful, showing up grain and knots, with undulations where they have been ‘shaped’. But, because they are engineered, they are virtually impermeable to scratches, moisture and damage – which is pretty much exactly what you want in a kitchen. Or in a basement, for that matter. Because we liked the wood so much, we’re using it there too. So five minutes in, we’ve selected the majority of our flooring. Like I said, keep up.

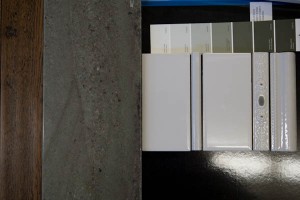
Of course, there is still tiling for the kitchen and flooring for the guest bathroom, which we are also tackling during this project. For the kitchen, we wanted something that would be traditional, clean and appropriate to an 1800s farmhouse kitchen. What we found, relatively quickly, was a really nice subway tile that had some beautiful accent tiles – a plain pencil tile, as well as a more ornate pencil tile. While originally drawn to the white version, holding the tile up to the sample of Bora Bora that we had said that the grey tiles were the way to go – the detailing on the ornate pencil tile matches the green of the Bora Bora granite perfectly, and the grey is a nice, clean accent.

Tiles for the kitchen. A simple subway tile, and a lovely accent.

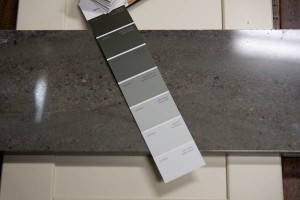
From there, it was a quick move to paint colours, along with a change to cabinet colours. One of the nice things about custom cabinets is that you can order them in quite literally any colour you want. And so we are going with a light grey-green upper, and a slightly darker grey-green on the lower cabinets and on the island, that perfectly pick up the colour of the granite and the tile backsplash. This means that, a half-day in, we’ve pretty much got a kitchen design. Pretty good work, if you ask me.

Take one Bora Bora granite sample. Add Benjamin Moore swatch book. Mix liberally.

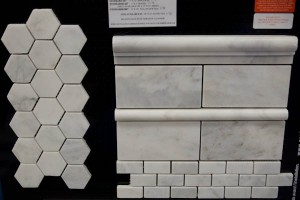
That led us to the bathroom. This led us to our first realization – which is that we never quite got around to picking a granite for the guest bathroom. We were so focussed on the kitchen that the idea of choosing stone for the bathroom slipped our collective minds. Not to be deterred, we decided to start with tiles and see where we went from there. Again, we were looking for something traditional and classic. Gene found a gorgeous hexagonal marble tile, that also had a matching subway tile and pencil and chair rail features. While we had originally considered it as an option for the kitchen, it quickly became our go-to choice for the bathroom.

Tile for the guest bathroom. Traditional hexagon floor, and awesome wainscotting options!

The design should be beautifully classic. The hexagonal tile will be the floor. We are also going to do tile wainscotting up the wall – the pencil tile will be at counter height, with subway tile below that. Above the pencil tile will be one more row of subway tile for a backsplash, topped by the chair rail. Beautifully traditional and European; inspired by some of the bathrooms that Dianne and I have adored while staying in Paris. Now we need to find a nice, clean piece of marble or granite to go with it – which will mean another visit to Alberto once he finds us our Bora Bora.

All in all, a good day. We found our granite for the kitchen, chose our flooring for most of the renovation, and found tile for the kitchen and bathroom. We returned to Boo Manor to check out our samples up close and in person, and by five-o-clock were dropping Gene off at his house. And joining him and Jenni for a welcome glass of wine or two to celebrate a day of decisiveness – while anticipating our choices for the next day.

When The Going Gets Tough, The Tough Go Shopping…

And so, it’s that time. The time to pick out what we want in terms of finishings for Boo Manor. Granite, flooring, plumbing, lighting… the works. This is where major dithering and debate can happen, not to mention untold arguments, disagreements, exhibitions of righteous indignation and walking-off-in-a-huff displays of orneriness. This is where a designer earns their keep, delicately negotiating between husband and wife, while trying to ward them off of decisions bordering on, in aesthetic terms, capital offences. Unless, of course, they are working with us. Then they just need to keep up.

The first order of business was finding granite. In that there are much fewer options for granite, and infinitely more in terms of tile, paint and colouring, the theory is that we start with an anchor and work up from there. So we picked up Gene and headed off to London to find some stone.

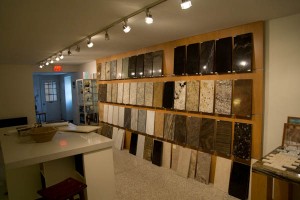
The granite showroom. How we are used to shopping for granite.

What we found at our destination was a showroom that looked a whole lot like the showroom that we picked our last granite from. There is a wall of samples, of a reasonable size, that show the types of stone available and the finishing options that can be applied. We hung around for a while, waiting for the granite consultant, considering our options. This, though, is not how Alberto helps you to pick granite. No wimpy samples for him. We’re going back into the warehouse to look at whole slabs.

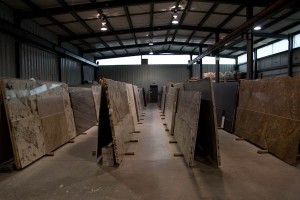
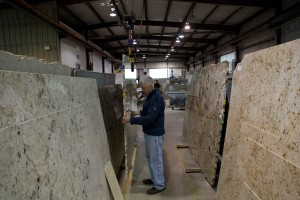
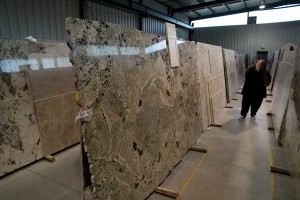
Shopping for granite, Alberto style. Samples? Bah. We’re going to look at slabs.

Granite, when quarried, starts life as a 50,000 lb. block of stone. And no, I am not making that figure up. It’s a block that is about six-by-six-by-nine feet in size. From there, it is cut into a slab that is, depending upon the quality of the stone, either 3/4″ or 1 1/4″ in thickness, but still a good six feet by nine feet in size. And not light. To check out one stone, Alberto had one of the workers turn it around. This involved a ceiling mounted crane that can literally go anywhere in the warehouse, pluck up a stone in hydraulic pincers, and carry it wherever it needs to go.

Moving a slab of granite. Making it look this easy involves some impressive machinery.

When you look at a slab, you realize just how much variation there is in stone. Two slabs mere feet apart in the original block can show completely different colouring and pattern. Given that a kitchen the size of ours will use at least two (and probably three) slabs, you need to work with consecutive panels from the same block. And you get to pick your slabs. The actual one that will go into your kitchen. Or bathroom. Or wherever.

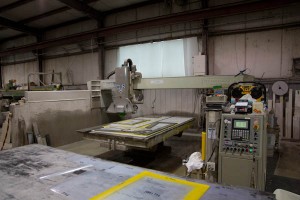
The CNC machine makes cutting giant pieces of stone look like child’s play.

Working with Alberto was hilarious. For the most part, he doesn’t think about price. Differences between grades one and five are rounding errors, and from there we progressively move from eek to boing. In his perfect world, every kitchen would be finished with Carrera marble. In fact, he showed us slabs that came from the same marble quarry that supplied stone for sculptures by Michelangelo. Impressive as that is, marble is really not optimal for a kitchen; it is porous, shows scratches and changes colour with time. For Alberto, this is ‘developing a beautiful patina’; and in a bathroom, I might go for it. But I cook with cast iron frying pans, and I’m not about to change, so granite it will be.

Having toured the warehouse in its entirety, we quickly settled on a short list of two slabs. As I said, keep up; we move fast. One was an amazing piece of granite that featured gorgeous, warm colouring – browns, beiges and blacks in a really intriguing, vibrant pattern. Very tempting, and for a while it was my first choice (although I think it never got higher than number two on Dianne’s short list). It would have made a major statement in the kitchen, and pretty much defined the look and feel of the rest of the room. Counters as show pieces. Two years ago, I would probably have gone there, as well. Today, we’re buying for us, not for what other people think of us.

A beautiful piece of stone. Vibrant and impressive.

And that led to what quickly became a unanimous choice – a mellow, green and brown granite slab dominated by gorgeous undulations of grey, black and brown; it almost looks sedimentary, but isn’t. That also led us to revisit our choices in terms of cabinet colour (we were going with an ivory cream colour, but have since recanted – we may be decisive, but we’ll still change our minds when necessary). Called ‘sea mist’ or ‘Bora Bora’, depending upon who you ask, it is a fabulous, relaxing, awesome-looking piece of stone. The two slabs in the warehouse, however, are already spoken for. Which will simply not do. Alberto needs to find us three slabs of Bora Bora, stat.

Bora Bora. Or Sea Mist. Your call. Alberto, we need three slabs.

Of Renovations New And Old

This is not the first time that the kitchen of Boo Manor has been renovated. It is not even, in fact, the first time that the kitchen of Boo Manor has been renovated by Gene, our designer/contractor/awesome-wood-working guy. The current kitchen was actually his first project on the house. It was also not his last.

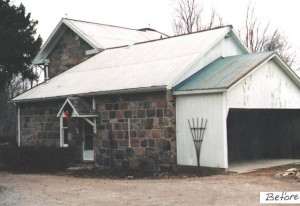
Boo Manor, pre-addition. Or renovation. Or any attempt at beautification whatsoever. (Photo Credit: Gene Martin Design)

The owners that built the current addition approached the project in phases. First was the kitchen, back in somewhere in the mid-to-late 1980s. Then came the garage and coach house, which was built in about 1992. The final addition, which added the great room and master bedroom, was constructed in 1996.

The kitchen, however, was an interesting case. The overall structure was itself an addition, although one that goes back to the 1880s. The walls, built in the style of the original house, are substantial. Because it is an addition, however, there was no basement – its foundation is at ground level.

I have already discussed the problems in the current kitchen: it lacks natural light, it has less storage than we would like and doesn’t make full and effective use of the room. Dianne is also not particularly taken with the colour of the cabinets or the countertops. All that makes a pretty strong case for renovating.

That said, there are also some definite positives to the kitchen. For starters, it was built by Gene. And by that, I mean that he physically built the whole thing. By hand. Himself. Gene is a woodworker, and in a previous incarnation of his business also did custom cabinet-making. Every box, every door, every drawer was hand-framed and built by him. And the result, 25 years on, is pretty damned impressive. The doors are all inset into the cabinet frames, and every single door and drawer still closes with precision.

That said, it is a beautifully built set of cabinets for a less-than-optimal room layout. Which means, sadly, replacing them with something else. Although we have been able to make use of a separate free-standing cabinet that Gene also built, which will now be refinished and take pride of place in the dining room as a china cabinet. The island will make its way to the office, where it will be an awesome working space. And the rest of the kitchen has found a new lease on life courtesy of Kijiji.

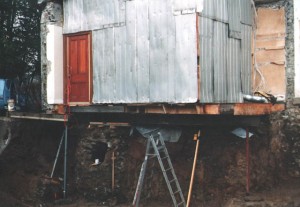
One of the most interesting thing about how the kitchen was renovated last, however, was its timing. As I have already noted, the kitchen was completed before the new addition was constructed. During the later renovation, the current owners wanted to (very reasonably) keep their new kitchen intact. This was easier said then done, however. Because the kitchen was a later bolt-on to the original structure, and because the addition was designed to integrate fully into the old house, the renovation needed to be done around the old kitchen. And by around, I mean around: beside, above, and below. It was a box that needed to be kept, without being obvious that it was a different box.

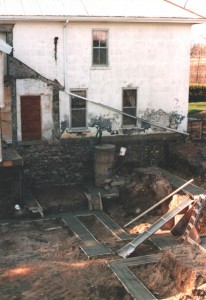
Excavations for the new basement. Love the drainspout on the old house; functional AND stylish. (Photo Credit: Gene Martin Design)

That meant a number of logistical challenges had to be addressed. The addition was being built with a new basement, which was excavated around the kitchen, leaving it floating in space above the new foundation. Until the addition was completed, it was wrapped in steel sheets that had previously been the roof of a lean-to garage, in an effort to keep the water out. And throughout the entire renovation, the tenants lived in the house, happily making breakfast mere feet from an open pit.

Watch that last step. It’s a doozy. (Photo Credit: Gene Martin Design)

Gene recently found some pictures from the time of the original excavation for the addition that illustrates exactly what they are dealing with. And impressively, the kitchen didn’t shift an inch through the entire process. It has good bones, this house. Really good bones.

To Ikea or Not to Ikea? That Really Is A Question

So we’re building a kitchen. A very big kitchen. A very big kitchen with lots of cabinets.

Having already built a house once, Dianne and I both know full well that one of the largest expenses in a kitchen is cabinetry. Our previous kitchen was built from custom cabinetry, and the price tag was impressive. So we already had some idea of what we were getting into as we considered taking on a brand new kitchen project, especially one that will now require as much cabinetry as is now being planned.

Many people swear by custom cabinetry, of course. Partly that’s practical: when you are dealing with a design that needs to fit within pre-existing walls, especially walls that are not necessarily completely square, fitting perfectly uniform boxes can be extremely awkward. Custom means that the cabinet will be tailored to fit regardless of the realities of the room. At the same time, some people insist on custom cabinets for the simple reason that they can.

Others will tell you that going the custom cabinetry route is a waste, and that you can get perfectly viable options much more cost effectively. What is considered one of the highest quality options, at a much more affordable price, is Ikea. Yes, that Ikea. The home of flat pack, Swedish meatballs and do-it-yourself hernias.

Ikea – Home of flat-pack, meatballs and do-it-yourself hernias (Photo Credit: North America Retail Architects Inc.)

While frequently snubbed as down-market, many renovators and designers have positive things to say about the quality of Ikea kitchen materials. Extremely positive things. One designer and renovator provides a detailed deconstruction of their kitchen materials, and why he has used them in more than 20 renovations to date. Another designer extols her love of Ikea kitchens, and explains why they are her preferred go to option.

The points they make are significant. The quality of their boxes are good, and often as good as you will get from a semi-custom kitchen manufacturer. Go to an Ikea showroom and open one of their cabinets, and you are faced with extremely solid 5/8″ thick MDF. Their hardware is also (mostly) excellent, and on par with custom installs, right down to soft-close drawers and doors. Their options in terms of drawer and door designs aren’t stellar, but are certainly competent. And if you do it right, and particularly if you install it yourself, you can get the same quality kitchen for as much as half the price. All of which are compelling arguments in favour of Ikea.

Ikea kitchens can indeed be funky, well designed and appealing spaces (Photo Credit: Carol Reed Designs)

So, to Ikea or not to Ikea? That is the question. For us, there are some drawbacks, and they are worth taking into consideration. For starters, the door styles tend towards the more modern. Based upon their catalogue, we thought they had a more traditional bead-board styling, which is what we are looking for, but it turns out to be a high gloss door with two inch strips of laminate positioned closely together to suggest bead-board. In the catalogue, it looked promising; in real life, sadly, it looks cheap. Their drawers have also changed since the two articles above; they are now exclusively plastic frames inside. I have no idea what their wear will be, but I’m enough of a snob to want real wood in my drawers, thank you very much.

We thought Ikea did bead-board. Less bead, more board, and not liking the final result (Photo Credit: Ikea)

The largest argument against, however, has to do with the size of the boxes. They are only sold in standard widths, meaning that if you are running the full length between two walls, there is a very good likelihood of leaving gaps at the end. More importantly, however, the height of all their cabinet boxes are standard, and designed to result in a uniform 36″ cabinet height once a counter is added. For my height, a counter of at least 39″ is a minimum; any shorter, and I can’t work for more than a half-an-hour in the kitchen without massive lower back pain. Meaning that our out-of-the-box Ikea kitchen would need about 35 linear feet of custom footings to raise the standard boxes to an appropriate height. The possible savings quickly start to disappear.

If you are trying to save money on your renovation, and in particular if you are going for a more modern look and feel to your kitchen, Ikea is certainly going to save you some money without sacrificing too much on quality. When it comes time to renovate the kitchen in the condo (and that day is certainly out there somewhere in the future) we full expect that Ikea will be our source of supply. For Boo Manor, however, we’re going the custom route. It will cost us more, certainly, but we get exactly the cabinets we need, at exactly the height we need them at. That is an investment that will quickly pay off.

Let The Renovations Commence!

We have finally taken possession of the house. Which means that the renovation plans can now proceed in earnest. And an hour after picking up the keys to the house, we were well into discussions on what to do and how to do it.

The plotting begins. Meeting at the house with Gene & Seren.

Since our initial meeting with Gene, he had been working on some conceptual options for how we could approach the renovation. In particular, a big question was what to do with the kitchen. Kitchens play a major role in any house. They are its centre, its gathering point, and the place every party migrates to. It is important, then, for the kitchen to be a place that you want to hang out in.

This creates a particular challenge in Boo Manor. The kitchen is truly the centre of the house – it is the dividing line, in fact, between the old house and the new house. Not just a place to wind up, it is in fact a thoroughfare, and one that is quite well travelled. On one side is the formal dining room, a gorgeous wood-panelled room in the original farmhouse. On the other side is the great room, the central living room with open windows, warm hearth and welcoming light. In between these two entertainment spaces, and central to both, is the kitchen.

The current kitchen has a number of problems. For starters, it is dark. It is an addition to the original house, but likely a very early one, and the walls are the same 18-inch-thick masonry featured in the rest of the farmhouse. Two narrow windows are the only source of light, and two doorways carve a path from old to new. The layout of the kitchen does what it can within this space; the cupboards and counter line one corner, and an island is an anchor in the middle of the room. Around the perimeter, however, is dead space. The previous owners had a table in the far corner, and a cabinet on one wall, but the result is a dark room that productively uses only a fraction of the space that is truly available.

Faced with this challenge, Gene came up with some options. The first was simply a refresh of what was there now; the same layout, just more modern and with new appliances. The challenge is that it solves none of the current problems, it merely gives them a new veneer.

Thinking inside the box only gets you so far…

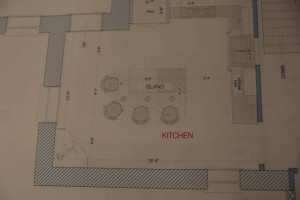
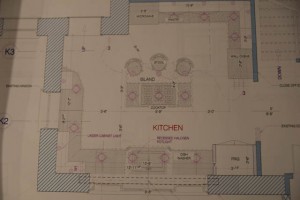
His second option, though, revisited the room from the outside in. To be functional, kitchens need a workable triangle between fridge, stove and sink. The sink is in many ways the anchor, and ideally is below a window, to give you something to look at while otherwise up to your arms in soapsuds. Given that the windows that exist are both narrow and in opposite corners of the kitchen, immediately adjacent to each doorway, they didn’t afford much in the way of an option. Gene’s solution? Let’s move the window.

And so began a design that envisioned a good 10 feet of window, lightening up the room considerably and providing a suitable anchor for the rest of the room. A counter could now line the outside wall, along with fridge, dishwasher and cupboard space. Across the room, more space for pantry, ovens, microwave and appliance storage. An island with cooktop becomes a central focal point for a completely revitalized kitchen that becomes somewhere you want to stop and spend time in, rather than something you want to pass through as quickly as possible on the way to somewhere else.

On the other hand, we could just completely rebuild the box…

The new design solves a number of problems with an otherwise difficult room. It becomes much lighter, makes far better use of space and provides considerably more storage. And all we need to do is carve a brand new window out of a hundred-year-old wall. That seems reasonable, doesn’t it?